Thursday, October 31, 2013

Workout for abdominal muscle

Hi sweeties,

          We always set a lot of weight in our stomach, tights and hip and that might led to some health problems or due to some health issues we tend to increase on weight in these areas so when ever you feel a difference do check with your doctor. Here I would like to share with you few exercises that are good for lower abdominal muscles and can also be carried out at home.

          Before starting any kind of workout we need to take care of few things that might help you they are

·         As soon as you have your meal never do any exercises you need nearly 2 hours of gap.

·         Drink lots of water in between the exercises and also before and after you do exercise.

·         Do stretches after the exercise which will help you to relax.

·         When you work out lot you need healthy food and make sure your in proper diet

·         Exercise with a proper diet will only help you in reducing weight. Just exercise is not enough so take care of your diet too.

Hope all this tips helped you and before starting your exercise you need to warm up your body. You can do jogging or jumping jacks to warm up yourself to start your exercise.


   1.   Roll Up Abs


          Lie on your back with stretching your arms and legs straight. Just inhale and get up touching the toe finger and exhale. By doing this there will be pressure in your lower abdomen. Try repeating this roll up Abs for 2 cycles of each 20 times. Initially start with one cycle and gradually increase it.


   2.   Hip crunch


Lie on the floor with your chest facing the floor and just lift your body parallel to the floor with hands 90 degree as the support and push a leg toward the abdomen and relax do the same to another leg and try repeating this for a one cycle of 20 counts.


    3.   Hip lift


      Lie on the floor with your back on the ground and raise your legs towards the ceiling and palms down in the sides and lift your hip off the floor by tightening the core muscles. Breathe in as you lower your hip. You can hold your hip as long as you can. The more you hold the more the effective.


Hope you liked the tutorial and i will meet you all with a new tutorial soon.

Note: Not all the exercise is suitable for everyone. You need practice and have proper training.


Monday, October 21, 2013

Makeup remover

Hi,

     Everyone feels lazy after a long tiring day and goes to bed without removing makeup that’s applied on face, this would create lots of problem to our face. I have put forward few questions that would help you in knowing the drawbacks of not removing makeup in the night.

Do I need to remove my make up in the night?

               Removing makeup while going to sleep should be made a practice. Our skin has lots of pores and it breaths too. But, while applying makeup those pores are just blocked and leads to a skin damage.
  

What kind of damage does our skin get?

        Our skin while not removing makeup gets damaged and that leads to a reddish spots, drying up skin, pores becomes weak this is just because of not removing make up. This small mistake on day’s course will lead into a big trouble in future for your skin.


How can I remove my make up?

        Removing makeup as said it is compulsory. Using a cotton pad add little makeup remover on it and wipe it all over the face. There are many brands available in the market checkout which works well for your skin tone and use it. Then wash your face with soap.


Have problems in removing eyeliners?

1.  For removing eye liners just apply a cold cream/moisturizing cream in your eyes and rub it gently for few minutes and then wash your face.I use Nivea for removing my eyeliner.
             
2.  Take a ear bud dip it in warm water and just rotate it along the eye liner and wash your face.


This will help you to remove eye liner.

Can I use a facial tissue for removing makeup?

        Never use a facial tissue for removing makeup while going to bed. As facial tissue are always good to set up your makeup. 
      That is when you use powdered products for your eye shadows, foundation it tends to melt after sometime, so after you apply your make up just use a facial tissue to press those powdered products that you used. That will help in setting your makeup evenly.

    So it’s wise to remove makeup before going to bed and protect your skins from all the problems by letting it to breath happily.


Sunday, October 13, 2013

How to make your lipstick last longer

Hi girls,
        I know many of us love wearing a lipstick and worried why does our lipstick vanishes soon and we need to apply it again and again. Yes I too had this problem and discovered a way to wear a lipstick that last long and it worked well, now I’m using this method and this last for a longer hour than usual. 
         I would love to share with you this idea so it helps you in retaining your lipstick for longer hours.


Step 1:

        Apply a moisturizing cream to your lip which you often apply to your face. And just leave it about a minute. Any moisturizing cream you use for your face can be used.

Step 2:

        Just take a little drop of foundation in your hand and apply it on your lips and then rub your lower lip with the upper lip.

Step 3:

        Apply a lip liner similar to your lip color. Just go around the border and apply it firmly where you don’t shake out. I used a Revlon Lip pencil with a Burgundy which goes well with this lip color and gloss.

Step 4:
        Then apply lipstick of your shades. I used a Lakme Enrich Metallic 659.This s a metallic color with a nice shine look.


Step 5:

        Apply a lip gloss on the top of the lipstick. I use an Revlon transparent gloss which gives a shiny and transparent look of the lip stick. 


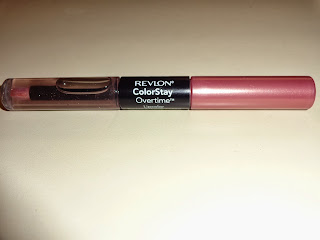
Just before that this Revlon colorstay lipcolor is two in one where in one side it has a transparent gloss(top coat) and on the other end is a top coat of a pink shade. This gloss is super and a long lasting, keeps your lips moist and gives a nice shiny texture to your lips. This cost 9.99$ or 912Rs in India and you can give a try hope you love it. Both the color are super awesome.


Just try out and feel the difference :)


Friday, October 11, 2013

Hair Straightening

Hi girls,
       We all love to have straight hairs and mostly when attending functions or going out for a date with loved once and we do a temporary straightening. I use a Panasonic straightening machine which is good and I love it. We can even curl the hairs but my hairs are already wavy so, I go for straightening it.


Step 1:

        Wash your hair and make it clean. When the hair is wet it is easy to straighten it. After washing brush your hair once as it will help in doing the process easy.


Step 2:

        Apply a heat resistance cream in your hair so that there will be reduced hair loss and we can protect our hair from damaging. This straightening cream is available in market with a variety of brands.


Step 3:

Divide your hair in separate portions and apply the cream on one portion.


 Step 4:

Take the straightening tools and ON the tool place it in one portion of hair and press it up to down for few minutes and leave it. Similarly do for the rest of the portion. 


       Once done to all portions just brush your hair.This is easy and very simple way to do  hair straightening.

Pros of Temporary Hair straightening:

  
    This method is very easy, simple and fast way to do straightening for hair.

Cons of Temporary Hair Straightening:


     1. This method is time consuming one.
     2. This doesn't last for more than 3 -4 hrs.


Monday, October 7, 2013

KAHO Nail art tool


Hi Beauties,

        We all are fond of nail art these days, I’m too one among it and started to learn, invent new tools available so that I could explore myself in the nail art/nail paint world. Here is one such tool I found recently KAHO nail art tool.

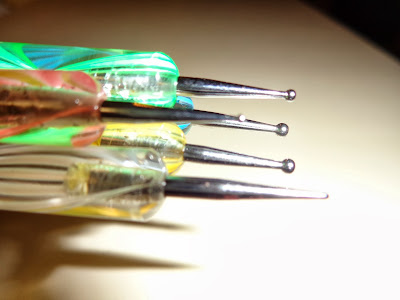
        KAHO nail art kit which I got a few days ago is amazing, very easy and simple nail art design can be done. This contains 5 pencils with both the ends with a different size of nobs. 


     This kit has come in wonderful colors and also with a small pouch which holds all these pencils and making it easy to carry where ever you go.


  This kit has 5 pencils where each pencils is in decreasing sizes the Tool 5 has bigger nods and Tool 1 smaller so you can use it as you like it. The nobs can be used for two reasons to create a dotted design for your nails or for an outline for the nail art.


How to use it?

        Using this nail art tool kit is very simple. Try out the following steps.

        Step 1: Apply a nail art and just let it dry for some time.

        Step 2:

               
          Take an acrylic color or a nail paint (prefer a contrast color it would look good) just dip the tip of the KAHO nail art tool of your preference size in the color and just place it over your nail. You can create designs as you like. The KAHO nail art tool 1 can also be used to create outline.

        Step 3: Just let it dry and your nail art is already.


Application is easy or tough?


        Everyone has this problem is application easy or tough, I too had same and got it just to give a try but it is very easy and simple tool.


How much this Cost?


        This KAHO nail art tool is cheap and you can get it less than 5$ or 250Rs. This is available in Amazon.


Pros of this tool:


1.  Easy to use.
2.  No need any expert guidelines.
3.  Low cost.
4.  Simple tool kit.

Cons of this tool:


       This tool can be used only for dotted designs and we can’t make any other design using this tool.


       Hope you all like this tool enjoy your nail art with this new and simple tool.


Wednesday, October 2, 2013

Nail art design simple and easy one

Hi babies,

          Have you ever tried a nail art at home? With just few materials that’s available at home? Here I would like to share few easy ways to do nail art at home which is simple and fast.


Materials Required:

1.   Nail polish(2 or more shades)
2.   Cellophane tape
3.   Scissors
4.   Black acrylic paint
5.   Brushes


Steps to be performed:

        
     Step 1:

             Apply nail polish of a desired color to your nails (you can use different colors to different nails also) and let it dry for some time.

Step 2:

         
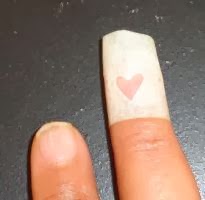
               Take a Cellophane tape and cut it in the shape you want it for the nail. Cut 5 pieces. I used a heart shape for my nail. You can use your desired shapes.


Step 3:

              
                Now paste the Cellophane tape in the all the fingers and apply a different color (contrast colors will be good) 


Step 4:

   
       Apply a nail color or acrylic paint inside the cut out shape apply a different color to your nail color so it would be contrast and looks good.


       Step 5

.     
                           Remove the Cellophane tape from the each nail carefully and let it dry.

      Step 6:

              
                               Now with normal acrylic paint or any nail marker just give an outline.
            

      Step 7:

                               Now your nail art is ready J


           Hope you all loved it and just try it in your home  C
H


Related Posts Plugin for WordPress, Blogger...